Thanks a lot dude.


Thanks a lot dude.
ATLANTA DA-Squad member #26...[{Home.BASE.Racing}]
R.I.P. LsVtec DB1....hello b20v EF...!
Originally Posted by cactusEG

Okay, 7/16 - 7/18/2008.
Its now time to update, even though i dont have any pics of the things i installed. Can't find the camera at the moment..The two last things i installed were, an Apex'i VAFC2, and a solid motor mount. Also, my next thing to purchase and install will be a couple of racing seats, similar to the one in the picture. Then, i will be getting my exhaust resonator removed, and a straight pipe installed in place. There is a long story behind the VAFC....
The Story on the VAFC:
Well, here is what happened. I ordered the Apex'i V-AFC2 from someone on ImportAtlanta, about 5 weeks ago. I immediately paid him, through PayPal and I was thinking that everything was okay. He contacted me, telling me that the product was on its way. It should have been at my house, not even a week later, because the person i got it from is located in Tennessee, and it was going to be a quick transit time. One week passes.... Still nothing.Another week passes.... still nothing. So, i finally begin to talk to the guy again, just to check up to make sure he didnt take my money and run with it. Turns out, he didnt. He told me that the USPS sent the package back to him, three times.
At this point, i am trying to figure out why in the world the USPS keeps sending it back to him.
Then, what i do is i continue to talk to him, and tell him to send the package to my local post office, and have them hold it at the office. Well, low and behold, i go out of town for a week. When i return, i am expecting a package to be held there at the Post office. Still nothing....Keep in mind, at THIS point, it has been 3 weeks and the package should have come 3 DAYS after paying this guy.
So. I start talking to the guy again, telling him where to send the package, and im giving him different possible addresses, and all of that. He then starts to send me pictures of the package and the address. It turns out that, he wrote the address on the package WRONG. He put my name on the top line, the item name on the second line, and then the rest of the address on the bottom two lines.
5 weeks.
Then, i come to partially install the VAFC in my car, and crank the car to test it. The screen shows up nothing. The thing is broken. In the mail, the part got broken. So, at this point, the VAFC2 is sitting in my car, hooked up to power and ground, with no screen action.USPS!
Last edited by GM_TUNER; 07-18-2008 at 02:41 PM.
ATLANTA DA-Squad member #26...[{Home.BASE.Racing}]
R.I.P. LsVtec DB1....hello b20v EF...!
More Pics will be up later...
ATLANTA DA-Squad member #26...[{Home.BASE.Racing}]
R.I.P. LsVtec DB1....hello b20v EF...!
hah wow, how long has it been since i posted in this thread?
Lol, it seems like its been forever since i last posted, but theres a reason for that. The reason is, because i had finally "finished" the car, i got it all up and running, i got it painted, emissions ready, and all of that. Since all that was taken care of, i had no reason to post. But, now there's a reason to post. This time, its all about the engine.
The past few days, i found that my engine had piston rings that were so bad, that the engine would blow oil pan gaskets like you wouldnt even know. I replaced the gasket 4 times, and then, thinking that i was doing something wrong when installing it, got it professionally done a 5th time. Then, even with a professional install, it blew out AGAIN. This time, i was fed up with it and decided to drive for about a week or so, with the pan gasket leaking everywhere i go, and constantly filling the motor with oil. Well, it just so happens that one day, i forgot to fill the car with oil before i left school and i get on the highway and my oil lamp comes on and stays on. Well, i was at Sugarloaf parkway, and i was hoping to make it back to at least pleasant hill before stopping and filling the oil. BOY was i wrong
. I began to feel the engine lock up, and i also began to see more smoke, and my water temp gauge was moving up as well. So, i stop, turn the engine off, and fill it with oil. Then, from here, i jump back onto the highway and within the space between pleasant hill and jimmy carter blvd, the engine was completely OUT of oil again. so i finally got home and the motor began knocking ever so slightly. stopped, parked, and replaced the oil pan gasket. re filled with oil and i also put some Lucas Oil Stabilizer in there too. But i noticed that there were some metal chips in the bottom of the pan that looked like they were made from copper or something...possibly my main bearings got chewed up slightly?

I re-assemble it, hoping and praying that itll run and that i wont need a new motor (immediately anyways...). i cranked it back up, and it ran just fine.
UNTIL!!!!!
I'm coming on my way home from DiscoverMills mall, and i get on at Sugarloaf once again, and i drive to Jimmy Carter blvd. Next thing i know, the engine is overheating, and randomly wanting to idle like complete s***. It would drop the rpms to 200 then raise them to 800 then drop, raise, drop raise. Every time the rpms would drop, the engine oil lamp would come on...
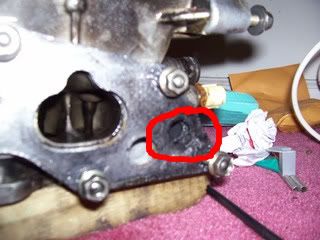
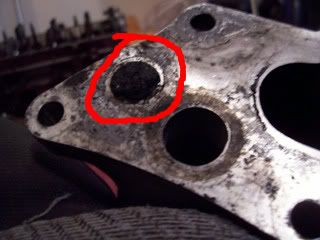
Now, somehow there was coolant getting into my cylinders, becase on cold startups, a S***LOAD of white smoke would come pouring out the exhaust....and, when i took the head off, i noticed there was some coolant in each cylinder as well....then, upon further inspection of the cylinder head and of the intake manifold, i find that the coolant passage was COMPLETELY BLOCKED with GRIME
1 - it had the passage blocked.
2 - water pump kept pumping harder and harder, psi grew....
3 - psi got to be too much that it just started seeping coolant into the cylinders....
4 - when that happend, it separated the headgasket....causing the terrible idle.
Thats just an educated guess though, lol
Heres pics of it..
ATLANTA DA-Squad member #26...[{Home.BASE.Racing}]
R.I.P. LsVtec DB1....hello b20v EF...!
Meanwhile, i've got two cylinder heads now. The stock one, and the OTHER one which im gonna have a little fun with...its going to have::
-Dual valve springs
-titanium retainers
-milled .020"
-new valve stem seals
-backcut valves
-5angle valve job
-new seals (cam seals, dizzy o-ring, etc.)
All work on the motor so far has been done by myself, and by Ball Engine Parts and Services. (look in General Tech Machine Shop directory...they do good work
ATLANTA DA-Squad member #26...[{Home.BASE.Racing}]
R.I.P. LsVtec DB1....hello b20v EF...!
Also, this little mini-build is going to be just a temporary fix until i can save up the money to get a B20.....or do a full rebuild on the 1.8L.
ATLANTA DA-Squad member #26...[{Home.BASE.Racing}]
R.I.P. LsVtec DB1....hello b20v EF...!

So, what color did you paint it and what all did you do to ''finish'' the car before you had the problems? My car is burning a shtload of oil, it's not looking good.
Bozzio for president.
The paint is matte black. I havent gotten it professionally done, and i probably wont for a good while, because theres something hot that i find about a car that is somewhat ugly, but not TOO ugly but is fast as balls.:boobies:
Now, i know my car isnt fast like that, but hey-- the money i would put into getting paint can be contributed to me making it become fast as ballz one day
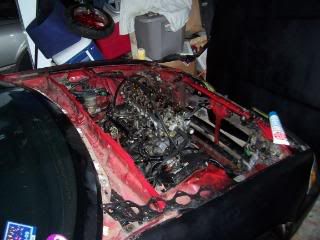
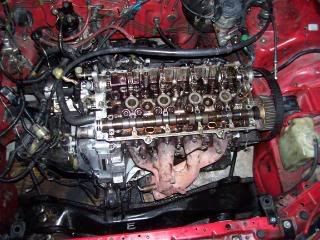
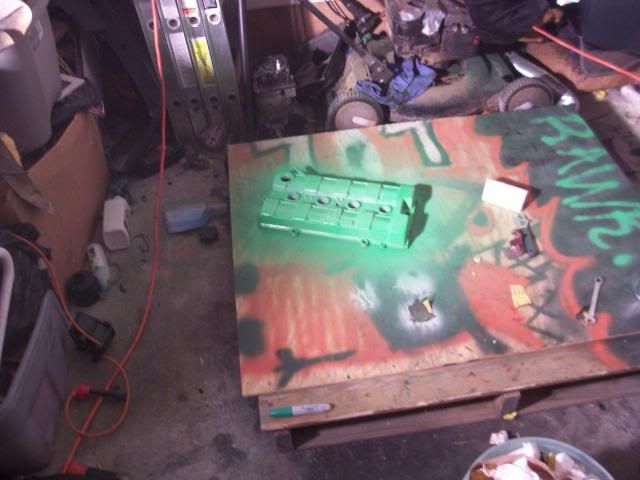
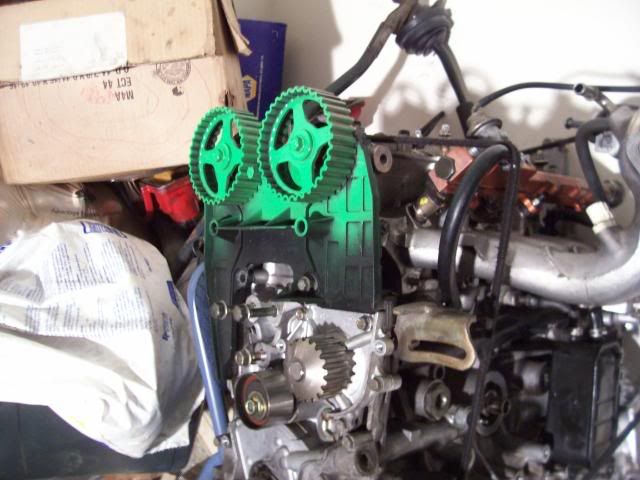
BTW:: HERE'S AN UPDATE, I WAS WORKING ON THE ENGINE FOR THE PAST FEW HOURS SINCE I MADE THE LAST POST, HERE IS PICTAS:
i cleaned and prepped the head...cleaned and prepped the block...cleared out that blocked coolant passage....installed new head gasket.....torqued the head down. here is where i am now, because like an idiot, i left ALL my rockers down at the engine shop, so it looks like ill just have to go pick them up tomorrow in order to continue with the build and get it all finished up
btw...this is the installation of the stock head, not the modded one. The modded one is at the shop now being assembled.
:idb:
OH, and another little goodie i got too.....its an aem fuel rail, genuine lol NOT bootleg

ATLANTA DA-Squad member #26...[{Home.BASE.Racing}]
R.I.P. LsVtec DB1....hello b20v EF...!
UPDATE:
Okay, wow. the engine is worse than what i thought. I rebuilt the top end, and installed a new head gasket.....cranked the engine up, and what do i get? a SH*T-TON of white smoke coming from the exhaust, but not only the exhaust, i get a whole lot MORE from underneath where the timing belt is, and where the oilpan meets the block, and it knocks a little louder now...
I can't really stand it anymore, so im just gonna have to get a swap. And its going to have to happen in the next couple of weeks because i've got to have my DD to get to school and back and its gonna be a lot of miles daily...
Called the engine shop, had to call off the head build so i can put that money towards getting a new motor.....Cross the fingers for a B20B!
Also, since i might be getting a b20, i might sell the LS modded head for someone else to have fun with. Let me know how it runs, whoever buys it from me.
ATLANTA DA-Squad member #26...[{Home.BASE.Racing}]
R.I.P. LsVtec DB1....hello b20v EF...!

good luck man, keep at it.

Goodluck on it bro..... Get that B20 and a B16 head and you'll be set! Maybe a GSR tranny
"Damn, Its Tyler"RaceReadyDevelopments
UPDATE: well, its a little bit late for the B20b...that won't be happening, i ended up buying a B18B out of a 1994 teg, with only 110k on it and the place said they test-drove the car/engine, and it has no smoke of any kind, and its got ~85 - 100% compression on it, so that's what's going in the teg, not to mention it has a 3 month warranty....
also, the progress on the swap has been EXTREMELY fast also, probably the quickest progress the car has made since i got it... After only 2 class days (or about 2 hours...MANhours is another story..), we got ~most of the engine ready. Theres about a 95 - 100% chance that tomorrow will be the day the engine comes out... lol my first engine swap, can't wait til i get it complete. The instructor told me that me and the class should be able to turn the car around and get it all up and running before the end of next week.
DiY Labor FTW, thanks a lot you guys who helped out on the project
ATLANTA DA-Squad member #26...[{Home.BASE.Racing}]
R.I.P. LsVtec DB1....hello b20v EF...!
Some pic's would be nice! lolol
"Damn, Its Tyler"RaceReadyDevelopments

Please remove all Sunpro gauges. At least go with Autometer
Ballin' on a Budget
I'll try to get some maybe tomorrow, but i'm not so sure how the school will feel bout it...
EDIT: All gauges are gone...Sunpro, Autometer, etc. Its time for a fresh start, plus i wont even need the gauges until im boosted
ATLANTA DA-Squad member #26...[{Home.BASE.Racing}]
R.I.P. LsVtec DB1....hello b20v EF...!
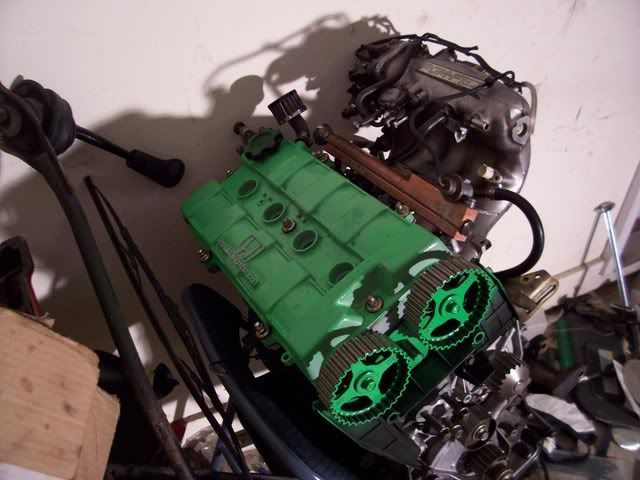
Small update....ValveCover painted....and cams(yep painted too.
Its kindof weird, i think, how i did the valve cover this time because it seems to change colors slightly in the dark vs. in the light...Camera probably didnt capture that, but IRL thats what it does....
1) in the light....
2) in the dark...
3)....stock-cams......:boobies:
ATLANTA DA-Squad member #26...[{Home.BASE.Racing}]
R.I.P. LsVtec DB1....hello b20v EF...!

Like always man!
~DB4LYFE
07 Honda GD3

looking pretty good man. keep the updates comin!
Thanks y'all for the +++ Feedback
ATLANTA DA-Squad member #26...[{Home.BASE.Racing}]
R.I.P. LsVtec DB1....hello b20v EF...!

niceeeeeeeee
Motor assembled w/VC and cams.....i hope thats not TOO much green..?
hmmmm.....
ATLANTA DA-Squad member #26...[{Home.BASE.Racing}]
R.I.P. LsVtec DB1....hello b20v EF...!
Get that bish in the car bro.....lolol
"Damn, Its Tyler"RaceReadyDevelopments
Hi, IA its me again. Havent been on here posting the build but it has most definately continued on even though i left it cliffhanging right before the biggest part of the project; The b18b1 goin into the car and finally having it run again. I'll probably post up the pics of that, and update you all as to what's been goin on with the car since...almost literally a YEAR ago, per someone on here who pm'd me looking for inspiration building the same car that i'm still in the process of putting together.
But first, heres a few snaps of the engine coming out/going in... We did this last year, at my high school in the shop class; it was the first BIG project of the year lol.
TO THE PICS!!!:
1) AEM fuel rail...
2)New Axles...
3)transmission mount was previously broken...?
4)got a new one from HPC....
5)ceramic coated header and downpipe!
6)supahh CLEAN custom cut VC..
7)AND heres how we know my old engine was BLOWN..

ATLANTA DA-Squad member #26...[{Home.BASE.Racing}]
R.I.P. LsVtec DB1....hello b20v EF...!

ha you call that a blown motor....
but good luck to you.
I♥my ruckus
You're the trashiest thing this side of the Mississippi.
Ghetto Fab: For kids on a fucking budget
~Lagg Squad~
<turbo negros>
I put the sexy in dyslexia.
R.I.P steven bond....
Now, y'all will get to see just a couple of the engine going out/being put back into the car. Its too bad i didnt really take any pictures of the engine WHILE it was out. Ended up taking nearly two months with the swap, but thats the only way to go through and inspect/clean EVERY single tiny little part and piece to make sure that when it went back together, it was a nearly immaculate swap... well with the exception that i didnt paint my engine bay..
1)pretty engine. lol
2)A couple friends helping out while i lazily document what's goin on
3)
4)the back of homeboy's head
5)b18b1 yayurp
6) and this was the final sitting place
7)and then Valvecoverswap...
8) another shot of teh freshness...

ATLANTA DA-Squad member #26...[{Home.BASE.Racing}]
R.I.P. LsVtec DB1....hello b20v EF...!

(Also, the updates im posting now are from almost a year ago now... LOL.)
ATLANTA DA-Squad member #26...[{Home.BASE.Racing}]
R.I.P. LsVtec DB1....hello b20v EF...!
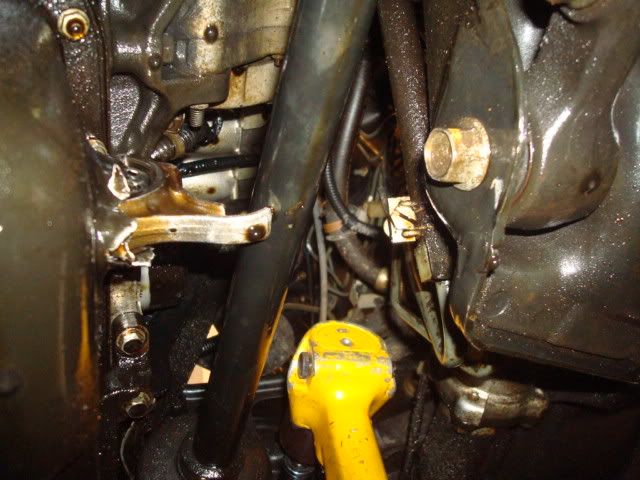
OK, so i had somewhat of a clean engine bay to begin with, but i noticed to myself that there was just one fat harness snaking its way across the engine bay from top to bottom on the right wall inside, and so i decided i needed a way to hide it/get rid of it. it was almost too much for me to bite off and chew because there were 14 wires inside this one harness, and i had to cut it and extend it around the outside of the engine bay to make it work, and took +4hours with me and a soldering iron after having cut the wires, to re-seal, insulate, and extend the wires. but anyways; onto the pics!
***SMALL disclaimer; this part might have some instructions to it, but if you follow my instructions and completely fry your car, it aint my fault. yu know, Just Sayin'...
1)engine bay... kinda clean.
2)this little fat harness...
3)OK, so i was thinking, where should i put this wire... ill try to slide it under the motor mount for starters....
4) But first, the stuff labelled below is just about everything you'll need to do this, minus the soldering iron, solder, shrink wrap, and electrical tape.
stuff listed:
-2 jacks
-breaker bar
-19mm socket
-17mm socket
-block o'wood
5)jacked up the car....
6)this is where jack #1 comes in handy... please ignore that little rash down there where the car was jacked wrong before..
7)Next, the second jack and the trusty block o'wood comes in handy to hold the engine in place, because when you remove the engine mount on that side, the engine has to be supported by SOMEthing...
8)HM... idk if i posted this before, but PB Blaster FTMFW!
9)ah yeah, now the mount is out, and we can slide the wire underneath...
Hopefully it wont rub on the alternator/timing belts..
10)eh, just not enough space.. time for Plan B...

ATLANTA DA-Squad member #26...[{Home.BASE.Racing}]
R.I.P. LsVtec DB1....hello b20v EF...!
OK, so here's plan B on the wire tuck; to cut through the harness and extend every wire into the fender well and still have everything work out just the way it would from the honda factory
1)unraveling 18 year old tape...!!!
2)OK, now the next step to do is label each and every wire twice, that way you know what goes where after you chop them and extend them. You label them twice, one for each new end.
The Hardest part of it all..
3)Yay, now that the wires have been cut i can run them outside of the engine bay, therefore making it look much cleaner! The only bad part about this is the fact that i now have 28 total connections to re-solder, and insulate perfectly or else my car is going to have some electrical issues... Also, its obvious that they dont reach anymore. so, a nice 450ft roll of 18gauge wire should take care of it.
4)connection?
5) Two hours later..partially done...the rest looks the same, only more like a rat's nest. lol i didnt get a final picture of the entire finished product but it looks a lot better than what's below.

ATLANTA DA-Squad member #26...[{Home.BASE.Racing}]
R.I.P. LsVtec DB1....hello b20v EF...!
FINALLY!! Keep them updates coming, brotha.
"Damn, Its Tyler"RaceReadyDevelopments
OK, now i know that slow-moving progress has actually seemingly gone lightspeed with the progress but its been over the time period of almost a year, please keep that in mind... but next, i figured that its time to build a little bit of power from the engine. But before you build power, its always nice to know what you're working with.
1) On Batlground's dyno for three pulls...
2)Had a nice GOOD bit to work with, especialy for it being a bone-stock LS... made 121horsepower and 110 torque to the ground.
3)lol kindof a teaser as to what's next, kinda not though..
4)kept all reciepts and bills of sale.... if anyone wants to buy my car with this swap in it, lol they have peace of mind and definite warranties as well on certain parts.
5) yay for all the parts!!
6)Golden Eagle FTW
7)I HAZ HAWNDATAUH!!!
8)OBD1 converted...
9)lol Mahdavi Motorsports blockoff
10) moar goodies, JEGS is an awesome website to order from
11) bon voyage!!
Currently as it stands, i still am in need to jump myself back on the dyno to see if i can get another set of numbers as to what my motor makes to the wheels as well as to get it tuned.... im hoping for ~150wheel horses untuned... ~170 - 185 tuned.
ATLANTA DA-Squad member #26...[{Home.BASE.Racing}]
R.I.P. LsVtec DB1....hello b20v EF...!
Also, thanks for looking
ATLANTA DA-Squad member #26...[{Home.BASE.Racing}]
R.I.P. LsVtec DB1....hello b20v EF...!
OK, as some of you all know that the last thing that i did to the DA was i installed a GSR head onto the LS block, and converted the car to OBD1.... Well, i ended up spending a nice bit of money on it all, and didnt get a chance to upgrade the most crucial part of it, which was changing the LS oil pump to a P72 oil pump... which caused my engine to not like me anymore, and also caused it to send a rod through the block.. And before anyone jumps on me about it, i know i know i'm learning a VERY expensive lesson the hard way and if i build another one of these the oil pump will be the FIRST thing i change out.. Here's pics...
1)
2) Carnage
3)
4)
5)
6)
(Im just oh so HAPPY that it didnt get so serious in there that piston-to-valve contact was made)
ATLANTA DA-Squad member #26...[{Home.BASE.Racing}]
R.I.P. LsVtec DB1....hello b20v EF...!

Wow nice carnage shots. I don't think you can solely blame the oil pump for that kinda failure. It was just a shitter bottom end that was used as hell. At least LS bottom ends are really cheap.
anyways, now that my engine is blown... i figured its either time to say goodbye to the DA chassis, and at first i was going to part out the car in order to help fund another car coming into the family, but when it came down to hacking the car up and selling its pieces i just couldnt do it
And, so i just decided to swap it out, and do a little or a lot more sprucing up around the car while its down and while i have the space in the engine bay to have a little bit of fun with it..////
Things to be done:
1) About to take the axles out....
2) Sittin' there, chillin wit no makeup on....
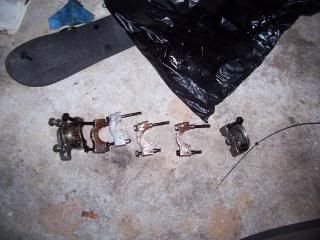
3)Gonna go ahead and remove both of these brackets and the AC hoses into the cabin n then smooth it out real nice....
4) And, clean up the brake booster and probably remove another little random bracket thats on it as well.
5) Also, (no need for a pic of this) but im going to be filling all the holes that are in my engine bay as well. :boobies:
ATLANTA DA-Squad member #26...[{Home.BASE.Racing}]
R.I.P. LsVtec DB1....hello b20v EF...!
Just decided to shave a couple more things from my engine bay.. Took out a nice handful of A/C lines, and removed a couple brackets and hoses that were protruding into the engine bay...
1)BEFORE and AFTER
2)

ATLANTA DA-Squad member #26...[{Home.BASE.Racing}]
R.I.P. LsVtec DB1....hello b20v EF...!
Since that last motor blew, was the last time I updated this thread.. well, I'm gonna go ahead and update it again as of now due to the fact that I have a balancing out of the parts... First of all, I rebuilt another LSvtec after that one with the 100,000mile bottom end decided to spit a piston and rod out the side of it... Which was sortof a hard thing for me to finally decide on doing since my reasoning was, ''why would i build an 'almost' exact copy of the engine that i just recenly blew up within 5days of having it running..?'' and I almost sold all the VTEC parts in exchange for some turbo parts. Which probably would've been just as fun for me, running and building.
But anyways, here we are.. I ripped out the motor/trans
LOL i knew that hole was gonna be good for something...
Then, shortly after that, I separated the engine from the transmission, and got to work tearing the rest of the block down just to see what the true condition of the rest of my equipment was before it blew..
Windage tray...
Everything else internally, looked somewhat good other than the fact that there was a hole in the block, and a crankshaft with one completely chewed out journal... Turns out, that the failure was due to this:
Broken and Bent Rod bolts....
LOL only took me about a day or so to do that block ''autopsy'', and i was onto my next venture; rebuilding a new heart for the 4-doe, and cleaning up...
ATLANTA DA-Squad member #26...[{Home.BASE.Racing}]
R.I.P. LsVtec DB1....hello b20v EF...!
^^^cont. from the last LATE post...Here's some sprucing up around the engine bay... I know, alot of you people don't like doing things with Bondo, but personally, I have no problem with it, as long as it looks GOOD in the end.
chopped a coupla brackets...
more bracket choppin'
started spraying up the bay, did it in sections...
next section covered....
color testing lol
HAD to clean it out! lol, my brake resivoir
yech....
cleeen cleeen tranny!
mmm, i think i like this color best, ehh?
mating call!! lolol
Letting the whole assembly just sit in its *new* final home
HARNESSES
heh, picked this nasty piece up in the junkyard... Lets restore it!
from this:
to this:
ATLANTA DA-Squad member #26...[{Home.BASE.Racing}]
R.I.P. LsVtec DB1....hello b20v EF...!
nice !
well what can i say to another db1 owner lol keep up the work bro
 Posting Permissions


 Reply With Quote