


This process can be used on any plastic lense head lights. Most plastic lenses have a clear coat that usually clouds up, much like older paint. Sometimes the clear coat will start peeling/oxidizing or clouding. Someone correct me if the terminology is incorrect. Here are the differences (not that it really matters):
Peeling/oxidizing:
Clouding:
Generally, cloudy head lights are easier to restore. The reason being, to restore a head light that has problems with oxidizing, is that you have to completely remove the clear coat not just "shine" it.
Once you determine which problem your head light(s) have I will tell you the best way to restore them. If your head lights are oxidizing, start with step 1, but skip 2/3 to step 4.
STEP 1:
Clean the head lights. As with polishing, if there is still dirt on the part while sanding, it can actually make worse scratches.
STEP 2:
If the lights are in the car while you're restoring them, I would recommend using blue painters tape to protect the paint.
STEP 3:
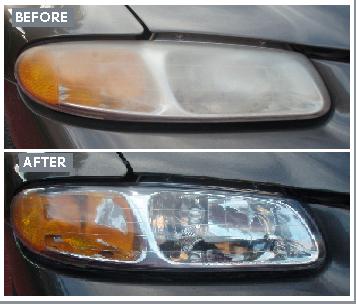
With wet or dry sand paper, wet sand the head lights with 600-800 grit sandpaper. This step should be done by hand in a light motion. In this step, you will remove the clear coat. As you can see in the picture above, there is a difference where the clear coat has worn off and where the clear coat has stayed (In the split picture, section B shows the before. Notice the lower portion of the light still has the clear coat and the upper portion has oxidized. The upper portion will need less attention as the coating is already gone).
Once you have the clear coating removed and the head light looks the same all over, it should look like frosted glass:
It resembles a cloudy head light, but the finish will be much more coarse.
STEP 4:
With 800 grit sandpaper, work down the scratches left from the 600 grit by wet sanding. After this, wet sand with 1200 grit, then 1500, and then with 2000 grit.
STEP 5:
Using a sander/polisher with a buffing pad and buffing compound, buff out the lights. I like to use a three step compound system to make sure I get a good shine, but I'm sure a one step would work just fine.
STEP 6:
Wax will help prevent the lights from fading, so be sure to put a couple coats on. I just use the same as I wax the paint with.
Enjoy
**Pictures courtesy of websites found on Google images**
If you have something to add or some more tips, please feel free to post them or PM me.


 Reply With Quote

